You Can't Make a Silk Purse Out of a Sow's Ear...
You know how I love to be thrifty? This is not one of those times...
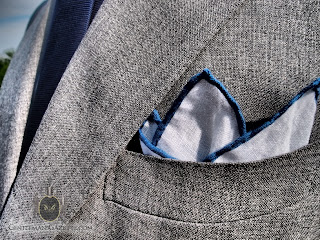
As a 'creative' I think it's important to know when to save and when to splurge, and this is one of those occasions when buying cheap fabric would be a false economy. By all means, try out the process on a scrap of fabric; but if it's for wearing or giving, then using the right materials for the job is more important than ever... with that in mind, I thought this would be the perfect Blog soundtrack for today - it just sounds perfectly silky-smooth and rich!I decided to make one of my best friends a silk scarf for his birthday... or so I thought... It appears, what I actually made is in fact called a pocket square... To me that name doesn't sound quite as luxurious or decadent; but that's what it is... here's a pic of one as an example...
Let me also describe what it is; a way a man can accessorize his suit; a piece of fabric that sits in the breast pocket of a suit jacket or shirt, that 'lifts' the outfit in some way (a lot like a tie can). I don't want to sound smug here, but it has long been my feeling that women are blessed with a myriad of ways in which they can change their look if they want to... Fellas, not so much. Poor things... So this is one of the small ways in which men can play around with their look... (have I already said 'poor things'? If I haven't, poor things...).
So... where to start..?
The 'true jeopardy' of this project...
The friend I was making this pocket square for, is a stylist.
I don't mean Jon-Paul makes a living from styling people, I mean he is a living breathing example of someone who KNOWS THEIR STYLE, AND INNATELY UNDERSTANDS EVERYONE ELSE'S.
 |
| A snap of me with JP at my birthday party last year |
Have you ever played the flute in front of someone who plays in the Philharmonic Orchestra..? Or served dinner to a Michelin starred chef..? Then you'll know how I feel when I'm getting ready to meet Jon-Paul... Don't get me wrong, he would NEVER say I look awful in what I'm wearing, or could 'do better', but my laissez-faire attitude to getting dressed gets shoved to one side when I know I'll be seeing Jon-Paul, and it's been that way throughout the twenty years I've known him (yes, he's also a Scouser). God... twenty years...
Some background info...
I know he'd want me to share with you the way we met... we were cast opposite each other in the musical Follies, and got married every night for the week the show ran... I'm lucky to call him one of my closest friends, and he manages to make everyone he meets feel special - it's one of his many talents. I know you'll think I'm biased, but throughout his career as an actor I've been stunned by his incredible capacity to become the character, to make the audience feel his every emotion; and now that he's chosen to dedicate his time to being a stylist, he continues to amaze me with his aptitude for truly connecting with every person and project he takes on.
I'm truly blessed to have him in my life!
So... now that I've made clear how important this silk square was, in terms of making it look good, well-finished, and stylish... I'll nip through the stages of 'how to'..!
Get two pieces of fabric that work well together, colour and drape-wise, and cut a perfect square out of the two, anything between 10-12 inches seems right to me (altho' you may well find differently in the shops, why not have a look and see what you find out there?).
Get two pieces of fabric that work well together, colour and drape-wise, and cut a perfect square out of the two, anything between 10-12 inches seems right to me (altho' you may well find differently in the shops, why not have a look and see what you find out there?).
Stop slipping around..!
I thought it would be important to do research on working with slippery fabrics... There were a few tips online that came out of that; firstly during the cutting process, it helps if the fabric is on a sheet, or tissue paper. Obviously that makes sense, if it's just on a table (or on wooden flooring, as my cutting usually is) then you're in trouble before you've even started. Not losing your rag (if you'll excuse the pun) is half the battle, impatience may mean ripping/tearing/cutting into the fabric in a haphazard fashion, and we DON'T want that, do we?
The more intriguing tip, for me, was placing tissue paper between the layers of fabric, and maybe even OVER the fabric, when actually sewing together...
Now I say 'sewing together', but actually it's possible to just have a square of fabric with neatly finished edges - there's no need to have two 'sides', but that's what I wanted, so that's what I'm doing here :)
Just so you can see what the alternative is, I took a photo of a pocket square in Harvey Nichols... Beautiful, and simple, all you need here is to sew the hem by hand; I found this great tutorial on Youtube that explains how to do just that...
There are conflicting pieces of advice when it comes to which thread to use when sewing silk. You'll find as many seamstresses advising silk thread (or a very fine equivalent) as you will advising a mixed, or 100% polyester thread, to give a stronger seam (which is what I used in the end). If you're new to it all, my advice is to ask the person in the shop you're buying the fabric from... this is kind of obvious, but needs to be said all the same... In terms of needle size, if you're sewing on a machine, use a new, fine needle, like a 70/10.
Sew the two pieces together, right sides together (for those of you that don't know what this means, it's the parts of the fabric you want to see when the piece is finished, the 'right side'). When you're doing this, be sure to leave a small area 'open' so that you can turn the square right-side out afterwards.
I made the decision to sew the squares, then cut the edges with my pinking shears. The truth is, I was trying to avoid creating bulk on the inside of the scarf (later on), but if anyone reading this has a better method to share regarding finishing the seams, please do - on the comments section below :)
When you've pulled the fabrics through the hole you've left, you'll be looking at a mini pillow case (!) that needs pressing and finishing. The hardest part of this, in my opinion, is sewing up the small hole, making it look like the rest of the seam (that's hidden on the inside)... Patience, and time, is required; DON'T attempt this in a hurry!
My recommendation is to press the square before sewing up the hole; this way you'll be able to use a knitting needle (or other tool) to ease the fabric fully out for the iron... otherwise you're left with a strange pleat encasing the seam... does that make sense?!
I bought my fabrics in Soho, from Biddle Sawyer Silks - I have to admit I was swayed by the doggy fabric that reminded me of Rod. (I can feel you rolling your eyes at this point... but that's the truth of it!). I chose the caramel coloured silk to compliment the doggy's coat...
And Sew to the Real Test...
Did Jon-Paul like it..? I think so... I mean, he made a fuss (which I knew he would, even if I presented him with a polished turd... OK, maybe not!) - but will he wear it in 'real life'..? Who knows!
The main thing I'll be taking from this is that I learned a lot in the process, and I'll very likely make another at some stage... It's a fairly simple, but beautiful, piece to make, and I'm a big fan of creating one-offs, so if you want one - shout! :)
And, if you'd like to check out Jon-Paul's impressive website, do!
 |
| Happy Birthday Jon-Paul!! |


I wouldn't do a two-sided PS - it ends up way too voluminous. It barely fits in his pocket! Stick to what the pros do and use a single silk cut.
ReplyDeleteThis is true... The other two I photographed (above) were single-sided, I was just going for contrast... But it doesn't feel like you've done anything to a one-sided PS, it's just a square of fabric! :) (with rolled hem...) Thanks for commenting!
Delete