Découpage - A Family Tradition...
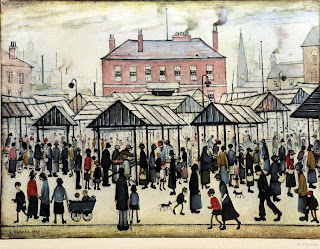
When I was little I remember my grandfather on my Spanish side (Abuelo) taking hours over his favourite hobby, découpage. I didn't know what it was then, all I knew was it was an intricate and delicate process that took hours to do, with pincers, varnish, glue, paper cut outs... and a steady hand. What he created was nothing like I’d ever seen before (or since, to be honest); huge creations, often full of little stick men, all looking larger than life… one picture has stayed in my mind all these years, of a famous Lowry painting he painstakingly brought to life...
And, in that vein, here's the Blog post soundtrack for today; one of my most favourite Spanish tracks ever... and yes, I know Shakira's South American (for the purists out there!)...
- and here's a quick How To from wikiHow. I'd like to point out that these explanations are very different from what I'm talking about on this post, as I'm discussing how to layer up the same image in order to create a 3D version of the original design; the purpose is not for the end product to be 'flat'. In fact, this Youtube tutorial on making a Christmas card is much more along the lines of what I'm talking about here :)
There's really not that much to it, it's an easy technique to master (apart from the fact I got covered in craft glue, but it comes off easily enough...), and the results can be quite stunning. Thing is, the 'after' photos don't really do it justice, in the sense it's better in the flesh. After all, it's a 3D accessory!
What would this be good for..? LOADS OF THINGS! With the possible exception of a floral satchel, that would just be daft... I mean, who wants to look at two contrasting floral prints??
And, in that vein, here's the Blog post soundtrack for today; one of my most favourite Spanish tracks ever... and yes, I know Shakira's South American (for the purists out there!)...
If découpage is a new concept for you, this is wikipedia's explanation for the term...
"...the art of decorating an object by gluing colored paper cutouts onto it in combination with special paint effects, gold leaf and so on. Commonly an object like a small box or an item of furniture is covered by cutouts from magazines or from purpose-manufactured papers..,"- and here's a quick How To from wikiHow. I'd like to point out that these explanations are very different from what I'm talking about on this post, as I'm discussing how to layer up the same image in order to create a 3D version of the original design; the purpose is not for the end product to be 'flat'. In fact, this Youtube tutorial on making a Christmas card is much more along the lines of what I'm talking about here :)
Cut to the backdrop...
A couple of years ago one of my friends at work received a package through the post... it was the bridesmaid dress she was due to wear only a few weeks later - as the bride had found it difficult to schedule a time for the whole wedding party to get together pre-ceremony (a common problem) and had resorted to sending dresses through the post. Although it was made up of a beautiful floral fabric, and had a wonderful fifties feel, it was too big - and the boning through the upper body made it sit strangely - so I offered to take it in, and up. Now I didn't have the foggiest idea of what I was doing, so Harriet was very brave in giving it to me (and this is the first time I've said this, so sorry if you thought I was a pro in these matters, Harriet!) - but I was determined to make a good job of it, and make her feel happy in it - which I believe is VERY important when you're one of the main wedding party, to feel happy all day... because it's a LONG time to spend unhappy!
The interesting thing was, when I chopped the length off, I was left with a lot of fabric... and you know how I hate throwing fabric away! So I looked at it... and looked at it... and decided to make some sort of matching accessory. The photo is of Harriet looking beautiful in the dress on the day...
.jpeg) Let's say - for argument's sake - you haven't just taken length off a floral dress, and you're starting from scratch... choose half a metre of a floral print fabric that catches your eye (it should be more than enough for the purposes of one project), then find the motif you'll be making into a brooch, or earrings, or corsage, or even hair slide... and check it appears more than three times in the length you're buying...
Let's say - for argument's sake - you haven't just taken length off a floral dress, and you're starting from scratch... choose half a metre of a floral print fabric that catches your eye (it should be more than enough for the purposes of one project), then find the motif you'll be making into a brooch, or earrings, or corsage, or even hair slide... and check it appears more than three times in the length you're buying...
followed by a pic of the earrings I presented her with at the same time as handing over the dress.


Why did I do it..? Possibly years of watching Abuelo painstakingly work on his projects sank deep into my psyche, only to pop up at this random point in my life! I'll now show you how I made these earrings with a step-by-step pictorial, this time I'm going for the brooch option...
This How To works...
...whatever you decide you want to make, will also dictate what you need to buy; they're called 'findings' in the trade, things like brooch bars, earring posts, metal combs... you'll also find glue and clear nail polish (in place of professional varnish) useful, if you're doing it the way I do!
.jpeg) Let's say - for argument's sake - you haven't just taken length off a floral dress, and you're starting from scratch... choose half a metre of a floral print fabric that catches your eye (it should be more than enough for the purposes of one project), then find the motif you'll be making into a brooch, or earrings, or corsage, or even hair slide... and check it appears more than three times in the length you're buying...
Let's say - for argument's sake - you haven't just taken length off a floral dress, and you're starting from scratch... choose half a metre of a floral print fabric that catches your eye (it should be more than enough for the purposes of one project), then find the motif you'll be making into a brooch, or earrings, or corsage, or even hair slide... and check it appears more than three times in the length you're buying...
You'll notice a few of the following shots have a green cutting board as the backdrop - it's new..! I'm excitedly using it for the first time! That and the knife..! Obviously you can use scissors, and there's no need for a cutting board at all... I'm just using my new goodies!!
The next part's fairly obvious - what you want to do is layer up the motif you've chosen. It would be a good idea to try things out, and have enough material to make mistakes, but if that isn't the case you could do a dummy run with a nifty bit of tracing and tissue paper. If you're anything like me you'll just go for it and see what happens! I love roses (full stop) and so I have no problem working with that sort of detail; but in short - when you're doing this kind of decoupage, what you're looking to achieve is a layering up of images that bring out the most prominent part with the final piece of fabric... does that make sense..? So, the largest motif is at the bottom, working to the smallest part of the motif to sit on top...
The next part's fairly obvious - what you want to do is layer up the motif you've chosen. It would be a good idea to try things out, and have enough material to make mistakes, but if that isn't the case you could do a dummy run with a nifty bit of tracing and tissue paper. If you're anything like me you'll just go for it and see what happens! I love roses (full stop) and so I have no problem working with that sort of detail; but in short - when you're doing this kind of decoupage, what you're looking to achieve is a layering up of images that bring out the most prominent part with the final piece of fabric... does that make sense..? So, the largest motif is at the bottom, working to the smallest part of the motif to sit on top...
It could be you choose to layer-up three or four 'motifs' in total, and you may choose to curl the edges on the edge of one of the layers (curled down, or up and I did with the rose petals... easing upwards while they're still wet with nail varnish so they set that way).
If you're wondering what to sandwich between the layers to add height, I used some thin foam packaging (*in a previous life it was protecting something someone sent to me). I also used that foam for the basis of the brooch, covering it in some pink polka dot fabric for a sweet contrast. I know, sickly, right? Well... you've gotta think what works with the main fabric pattern (mine's rosey) and dotty does, OK?
*sorry if I sound slightly defensive, but this is turning out to be much more girly than I'd originally intended...
What would this be good for..? LOADS OF THINGS! With the possible exception of a floral satchel, that would just be daft... I mean, who wants to look at two contrasting floral prints??


.jpeg)


.jpeg)
.jpeg)


You must have had an innate confidence and sense of talent in order to take on that bridesmaid's dress, which has been borne out by your subsequent efforts.
ReplyDeleteIt's nice to see you carrying the family tradition on and perhaps moving it on.
My own sense of inner belief came to grief as a child, having watched a magician on TV the previous night I bounded into my parents room with a small bag and a hammer.
I woke them up then put my dad's watch in the bag and proceeded to bash it with a hammer, then triumphly announced that the watch would now be produced whole.
Queue a bag of bits, ironically my feet didn't touch the ground..
That's hilarious! I know it wouldn't have been at the time, but I bet you all had a good laugh about that after!! :)
DeleteBrilliant post, Gema. Who knew you were so multi-faceted! Sewing... decoupage... I'm impressed!!!
ReplyDeleteThanks Ricky- yeah, I'm surprising myself!! Ha ha..! X
DeleteBrilliant, Gema! And Harriet's dress! Looks stunning (I hadn't seen the end result!). x
ReplyDeleteThanks Hannah! Yeah, Harriet looked beautiful didn't she? :) xx
Delete