Summer Showers!
I watch this, and my heart aches a little... on direct draping (or moulage) at Christian Dior...
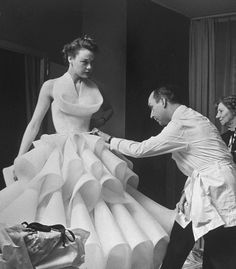 now this ISN'T the soundtrack for today's post, it requires watching, not listening to... So if you have the time, sit back and take a few moments, and (if you're anything like me) admire the process behind the scenes, of haute couture in action. I've never been a labels person, spending a lot of money of designer wear is not something I really aspire to - but, in watching this, I have a much better appreciation of what goes into creating (*some) designer clothing... in fact, if you let this roll onto the next youtube video, you'll see how just ONE dress goes from material on the roll, to catwalk, and the amount of people involved in that. It's quite incredible. I can't imagine how many hours go into creating ONE bespoke piece.
So, I hope you'll excuse that rather large intro - I just wanted to set the scene for what's about to come (don't worry, you won't be tested!). Basically, on this particular refashion, I used a lot of the techniques shown in that video. Not least because that's how I learn (through watching videos) - but also because if that's how THEY do it, then it must be worth copying. As someone without a proper background in sewing, or fashion design, this is how I accumulate knowledge, and pick up tips. And THAT'S a rather long-winded way of saying, I wanted this final piece in the Refashion Runway series to be SPECIAL.
The blogpost soundtrack for today? Well if you can imagine me doing the dance from Fresh Prince of Bel Air, that's EXACTLY what's going on in my lounge! Right now!
I know, it's a funny combination put next to Dior, right?
So... I was wandering around a few weeks ago, looking for inspiration, and saw this brightly coloured shower curtain...
 The thing is - although I originally bought it to brighten up my tiny bathroom, I underestimated the length of the room (ie, it's not so tiny)... the shower curtain is only long enough to fit in the recess of the bathroom, not where it needs to be (as you can see in the pic, it's cutting the bath in half!). Anyway, I often look at things as textiles, not as the thing they are - so I decided to hang onto it, and wait for a reason to use it... AND HERE IT IS, the asymmetrical challenge, the FINAL challenge, in this season of the Refashion Runway! Yeay!
So - I wanted to a) make something asymmetrical, b) test myself using techniques I hadn't used before and c) end up with something rather glam... I say 'glam' because the Boho Chic number will get a lot of wear on a day-to-day basis, so I'm addressing the balance this time with something for special occasions :)
Knowing it was going to be asymmetrical, and knowing I had a lot of fabric to play with, I decided to make the flamingoes the focus of the dress. (actually, how could they NOT be the focus?!). I had my heart set on using ALL the shower curtain fabric (apart from the plastic bits), and also making something a little more...dramatic... So I started by cutting the shower curtain along the point where the flamingo print started...
 ...and then chopped the light blue fabric away from the plastic hoops, before playing with those two long sections of fabric, with Dolly! These were my two favourites;

 This is a lined, one-shouldered, blue satin dress that's far too small for my lower half, but I quite like the top part. I also liked the idea of doing something with a structured bodice, but I was concerned the curtain would be too flimsy to make anything sturdy enough for adding boning, so this could just work...
I started by following the dress zip, in the side seam, to its conclusion (near the hip) and cutting straight across the dress with pinking shears. I then snipped vertically into the chopped dress, to create more room for manoeuvre around the hips, before adding anything else to the new 'bodice'.

By the way, I did consider just adding the flamingoes to the blue dress, and being done with it...


So, I hope you'll excuse that rather large intro - I just wanted to set the scene for what's about to come (don't worry, you won't be tested!). Basically, on this particular refashion, I used a lot of the techniques shown in that video. Not least because that's how I learn (through watching videos) - but also because if that's how THEY do it, then it must be worth copying. As someone without a proper background in sewing, or fashion design, this is how I accumulate knowledge, and pick up tips. And THAT'S a rather long-winded way of saying, I wanted this final piece in the Refashion Runway series to be SPECIAL.
The blogpost soundtrack for today? Well if you can imagine me doing the dance from Fresh Prince of Bel Air, that's EXACTLY what's going on in my lounge! Right now!
I know, it's a funny combination put next to Dior, right?
So... I was wandering around a few weeks ago, looking for inspiration, and saw this brightly coloured shower curtain...

So - I wanted to a) make something asymmetrical, b) test myself using techniques I hadn't used before and c) end up with something rather glam... I say 'glam' because the Boho Chic number will get a lot of wear on a day-to-day basis, so I'm addressing the balance this time with something for special occasions :)
Knowing it was going to be asymmetrical, and knowing I had a lot of fabric to play with, I decided to make the flamingoes the focus of the dress. (actually, how could they NOT be the focus?!). I had my heart set on using ALL the shower curtain fabric (apart from the plastic bits), and also making something a little more...dramatic... So I started by cutting the shower curtain along the point where the flamingo print started...


On the left I've gone for a shorter skirt (pinned up), and a wrap around, one-shouldered bodice. On the right I've kept the full length of the skirt, and the bodice is very simple - using only a single layer of fabric. It became obvious what I was looking for; something with a basic blue bodice, and flamingoes in the lower half of the dress. The only issue I had, with both of these looks, was I couldn't work out how I was going to get in and out of it! I mean, both bodices were achieved by wrapping the blue fabric around Dolly - and there's no stretch in this material, so I wouldn't be able to just pull it over my head. That's when I remembered something lurking in my stash!

I started by following the dress zip, in the side seam, to its conclusion (near the hip) and cutting straight across the dress with pinking shears. I then snipped vertically into the chopped dress, to create more room for manoeuvre around the hips, before adding anything else to the new 'bodice'.

By the way, I did consider just adding the flamingoes to the blue dress, and being done with it...

...but I wasn't completely sold on the idea, after all - I had all that matching light blue fabric to work with, so I returned to my original plan; I'd use the satin dress to 'line' the top half of my new dress!
Before I started sewing, I wanted to get rid of the fold marks that were in the curtain. I was afraid of leaving a hot gooey mess of plastic all over the iron plate, so I started at the lowest setting, and went up in small increments. I'm only sharing this with you so you know at what temperature to iron a plastic shower curtain. Should you ever need that information...

The 'sweet spot' was somewhere between the Silk and the Wool setting. Moving on.
For the bodice, I started by strengthening all the fabric edges of the curtain with pale pink bias binding, and then wrapped the length of it around the blue dress, pinning at regular intervals, and leaving out the top 'lip' of the dress for later...

There were some obvious 'gappy' bits, and where they occurred I created darts. Obviously it's not an ideal way to sew, very fiddly, and by hand (so takes much longer to do) - but there was to be a lot of hand sewing with this dress...

When I'd finished the bodice, I concentrated on the ruffle, to cover the top 'lip'.
I took the remaining blue fabric, pinched it regularly to create folds, then chopped it in half lengthways...

For the edge of the frill that would be on show (outside the dress), I added a trim of pink bias binding (which only shows when the wind blows!). I then sewed reinforcement stitches along every fold, before attaching the new frill to the inside of the dress, and along the length of the existing one-shoulder 'strap'.
I thought about leaving the pink trim on show... but it seemed a bit 'carnival', so turned it in, would you have left it out, on show?

For the skirt, I'd originally wrapped it around my waist, sarong style, but I felt it seemed a little bit solemn in it's straight form. That might seem like a funny way of describing it, but next to the top half, I wanted something a bit more...fun. So I took up the hem at regular intervals, and sewed in place with a few stitches, creating a bubble hem...

I also draped the skirt in such a way that the side opening would also rest a little lower at the front, thereby creating a high-low hem, coming to a point under the left hip (in line with the over-the-shoulder ruffle). In this way, I was hoping to 'balance' out the dress; you can judge for yourself if I managed to achieve that!
I then attached the skirt to the bodice by understitching from one side seam (where the zip started), around the waistline, to where the zip started again, making sure it stayed flapped across the body by stitching on a little velcro, about 10cms below where the zip finishes. I tinkered with the idea of adding a hook and eye closure, but it created a little dent in the fabric, and I was going for a really 'flowy' piece; I didn't want any hard lines, if that makes sense? The bubble hem appears to have no solid edge, the neckline frill hangs over without visible seam finishing... as much as possible, I wanted it to look... dreamy! Honestly, I think the fabric print had started to play with my mind!!
As a side note, the great thing about using the satin dress for structure is that I feel secure wearing the end product. The boning, lining, and side zip, all give the end garment a strong base for the dress to float away from. I would LOVE to do a course in corsetry, but until then, that blue satin dress serves that purpose admirably!
SO! Now I want to get to the AFTER photos!! SO............................

It was a little windy when we took the photos, but I quite like the movement it gives the dress... and it matches my playful mood when I wear it!

I think this dress is a bit Grease-Meets-Xanadu. I mean, doesn't every woman need a bit of late-70's-early-80's-Olivia-Newton-John-Whimsy in their wardrobe?? Well I do!! haha!

Oh yes, just a quick (non-movement) shot of the dress on Dolly, so you can see it better!

I'm dumbstruck by the fact I'm through to the final - especially as Laura is such a talented seamstress; I fully expected it to be me leaving the line-up this week. I've just been on her site to see her asymmetrical garment, and it's so beautifully made... And, just as she's stated there, I'm now a fan of all the ladies who entered, and will be following their blogs from now on - I'd encourage you to do the same :)
In the meantime, here's the link to Beth's site so you can vote for your favourite... to be the winner of this year's Refashion Runway! I have been floored by the craftsmanship, talent, and creativity of all the ladies involved - I honestly feel it's been an honour being part of the line-up.
My only concern is what I'll do with my time now... :)
(Actually... I have some news to share, but that can wait!)
For now, wishing you a wonderful week!
Gema x


Well butter my butt and call me a biscuit. You really meant it when you said nothing in your house is now safe from refashioning!
ReplyDeleteI love that 70s/80s flare of yours! And just saying, you don't really need a course in corsetry because you did a pretty fine job. The combo of blue and florals got me sold at once.
That's HILARIOUS!! I've never heard that expression before, but I'll be getting it into a conversation today, you can be sure of that! Haha!
DeleteAnd thank you, I always feel like I'm winging it, so I'm pleased you like it xxx
Aw, thanks for the shout out :) ...I'm actually glad you clarified the "sweet spot" for getting the wrinkles about because I was wondering about that! Now I know... Also, I'll be singing the theme to Fresh Prince all day now. Thanks.
ReplyDeleteHahahaha!! X
DeleteYay-ay-yay. .. onward and upward. Vote, vote, vote for Gema Kate , she"s the seamstress with the mostest . Wonderful ideas and wonderful blogs and clear,clear explanations
ReplyDeleteYou followed every directive to the end, they wanted bo-ho chic, you gave them bo-ho chic,they wanted maxi, you gave them maxi Ypu gave them what they wanted and MORE. No deviating from the t and c's for my girl - my clever, clever girl
So talented and never had a day's instruction in your life . So, so proud. Love you to win but any which way you stand out for me. WELL DONE.
Thank-you so much Mum. My completely-unbiased Mum... ;) Love you x
DeletePutting the show into shower, well done Gem, you've shown great ingenuity throughout the competition and I think you'd be a deserved winner, my vote's gone in, fingers and toes (all 19 of them..) crossed for you..
ReplyDeleteThank-you Brian, very much... and your 19 digits... :)
DeleteSorry I'm just now saying it, but congratulations on your 2nd place victory! I'm not gobsmacked at all ;) I had a feeling you'd place second (tied or otherwise). Congratulations! Wicked prize, too... I'm a little jealous :)
ReplyDeleteThank-you so much Laura; and yes - I'm over-the-moon about the prize..! I mean, I went the whole way through not knowing what was 'up for grabs', so I feel very lucky to have this new dressmaking software to play with... can't wait to spend a few hours on it...!!
DeleteAnyway, you have nothing to be jealous about, not with your curtains. ;) x
Congrats on your achievements Gem, well deserved, onwards and upwards.. what was the prize? I missed that bit.
ReplyDeleteThank-you Brian, I'm really chuffed :)
DeleteI won a top-of-the-range dressmaking software program... it's pretty complex, and does A LOT, but the crux of it is that, with any given measurements, it will produce a garment, ready for print out. I'm not sure I'm explaining it well, need time to play with it, but rest assured it's AMAZING (to me), and I'll be writing up on it as soon as I have something to say! :)